|
1.安装pcre-devel
yum -y install gcc gcc-c++ rpm-build mysql* php* automake autoconf libtool make --skip-broken
pcre是Nginx 所需的pcre-devel库,安装pcre库是为了让Nginx支持HTTPRewrite模块
pcre下载地址:
免费下载地址在 http://linux.linuxidc.com/
用户名与密码都是www.linuxidc.com
具体下载目录在 /2013年资料/8月/17日/CentOS 6.4安装配置Nginx+Pcre+php-fpm
下载方法见 http://www.linuxidc.com/Linux/2013-07/87684.htm
[root@vb01 src]#unzip pcre-8.33.zip
[root@vb01 src]#cd pcre-8.33
[root@vb01 pcre-8.33]#./configure
[root@vb01 pcre-8.33]#make
[root@vb01 pcre-8.33]#make install
2. 安装nginx
这里下载的是nginx-1.4.2稳定版
[root@vb01 src]#tar zxvf nginx-1.4.2.tar.gz
[root@vb01 src]# cd nginx-1.4.2
[root@vb01 nginx-1.4.2]# ./configure --help #查看可使用的模块,比如:
--prefix=PATH set installation prefix # 设置安装目录为PATH
--with-http_stub_status_module enable ngx_http_stub_status_module #用来启用NginxStatus功能,以监控Nginx的当前状态。
--with-google_perftools_module enable ngx_google_perftools_module #使Nginx支持google-perftools的模块,使用TCMALLOC优化Nginx的性能时会用到。
[root@vb01 nginx-1.4.2]# ./configure --with-http_stub_status_module --prefix=/usr/local/nginx
[root@vb01 nginx-1.4.2]# make
[root@vb01 nginx-1.4.2]# make install
3.Nginx的全局配置
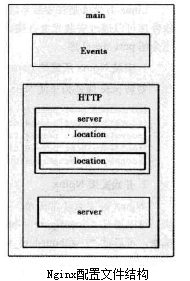
Nginx的整个配置配置文件是以block的形式组织的,每个block一般以一个大括号“{}”来表示,block可以分为几个层次,整个配置文件中main指令位于最高层,在main层下面可以有Events,HTTP等层级,而在HTTP层中又包含server层,即server block,server block中又可分为location层,并且一个server block中可以包含多个location block.
[root@vb01 conf]# vi /usr/local/nginx/conf/nginx.conf
user nobody; #设置Nginx Worker进程运行的用户,默认是nobody不用管。
worker_processes 1; #指定Nginx开启的进程数,默认个就够了
#error_log logs/error.log;
error_log logs/error.log notice; #定义错误日志文件输出文件和级别
#error_log logs/error.log info;
pid logs/nginx.pid; #Nginx进程ID存储的位置
google_perftools_profiles /tmp/tcmalloc;
events {
worker_connections 1024; #指定连接数上限
}
4.http模块的配置
http {
include mime.types; #配置文件包含文件的设定,特别对于多虚拟主机的设置时可以减小主配置文件的复杂度。
default_type application/octet-stream; #设定默认类型为二进制流,当文件类型未定义时使用这种类型,例如在没有配置PHP环境时,Nginx是不予解析的,此时用浏览器访问PHO文件就会出现下载窗口。
log_format main '$remote_addr - $remote_user [$time_local] "$request" '
'$status $body_bytes_sent "$http_referer" '
'"$http_user_agent" "$http_x_forwarded_for"';
#上面这段代码设置日志的格式,默认就行。
access_log logs/access.log main;
sendfile on;
keepalive_timeout 65;
server {
listen 80;
server_name localhost;
#location用于匹配网页位置
location / {
root html; #设置网页根目录
index index.html index.htm; #index设置默认首页地址
}
error_page 500 502 503 504 /50x.html;
location = /50x.html {
root html;
}
}
default_type application/octet-stream;
log_format main '$remote_addr - $remote_user [$time_local] "$request" '
'$status $body_bytes_sent "$http_referer" '
'"$http_user_agent" "$http_x_forwarded_for"';
access_log logs/access.log main;
sendfile on;
keepalive_timeout 65;
5. 添加一台server虚拟主机www.linuxidc.com,根目录为/var/www/linuxidc
server{
listen 80;
server_name www.linuxidc.com;
access_log logs/linuxidc.access.log main;
location / {
index index.html;
root /var/www/linuxidc;
}
}
6.Nginx的启动
/usr/local/nginx/sbin/nginx -t # 检测配置文件的准确性,如果配置文件非默认目录需用 "-c" 指定配置文件位置
/usr/local/nginx/sbin/nginx -t -c /usr/local/nginx/conf/nginx.conf
/usr/local/nginx/sbin/nginx -v #查看版本信息
nginx version: nginx/1.4.2
启动Nginx
/usr/local/nginx/sbin/nginx
查看Nginx是否启动
[root@vb01 conf]# ps -ef|grep nginx
nobody 13254 13253 0 10:12 ? 00:00:00 php-fpm: pool nginx
nobody 13255 13253 0 10:12 ? 00:00:00 php-fpm: pool nginx
nobody 13256 13253 0 10:12 ? 00:00:00 php-fpm: pool nginx
nobody 13257 13253 0 10:12 ? 00:00:00 php-fpm: pool nginx
nobody 13258 13253 0 10:12 ? 00:00:00 php-fpm: pool nginx
root 21621 1 0 14:47 ? 00:00:00 nginx: master process /opt/nginx/sbin/nginx
nobody 21622 21621 0 14:47 ? 00:00:00 nginx: worker process
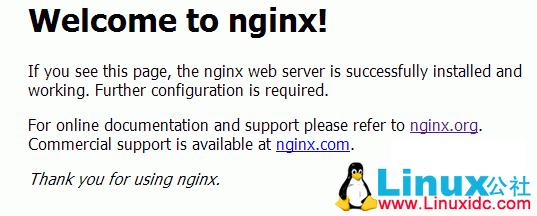
打开浏览器 输入IP可以看到如下,说明服务器启动成功
Nginx的关闭:
Nginx的关闭:kill -QUIT pid
Nginx的平滑重启:kill -HUP pid
QUIT:表示处理玩当前请求后,关闭进程
HUP:表示重新加载配置,也就是关闭原有的进程,并开启新的工作进程,此操作不会中断用户的访问请求。
USER1:用于Nginx的日志切换,也就是重新打开一个日志文件。
USER2: 用于平滑升级可执行程序。
WINCH:从容关闭工作进程。
7.安装PHP和PHP-FPM
我用的是yum默认安装PHP,如果是编译安装在./configure编译选项中要加上“--enable-fastcgi”来启用PHP对FastCGI的支持,“--enable-fpm”是激活对FastCGI模式的fpm支持。
yum -y install php*
PHP全局配置文件是:/etc/php.ini
PHP-FPM引擎的配置文件是:/etc/php-fpm.conf
这里我们先看如何启动 php-fpm:
1,查找php-fpm在sbin下的可执行启动文件的位置,我的默认是/usr/sbin/php-fpm
[root@vb01 src]# locate php-fpm
/etc/php-fpm.conf #配置文件
/usr/sbin/php-fpm #启动文件
2.查看可选项:
[root@vb01 src]# /usr/sbin/php-fpm -h
Usage: php-fpm [-n] [-e] [-h] [-i] [-m] [-v] [-t] [-p <prefix>] [-g <pid>] [-c <file>] [-d foo[=bar]] [-y <file>] [-D] [-F]
-c <path>|<file> Look for php.ini file in this directory
-n No php.ini file will be used
-d foo[=bar] Define INI entry foo with value 'bar'
-e Generate extended information for debugger/profiler
-h This help
-i PHP information
-m Show compiled in modules
-v Version number
-p, --prefix <dir>
Specify alternative prefix path to FastCGI process manager (default: /usr).
-g, --pid <file>
Specify the PID file location.
-y, --fpm-config <file>
Specify alternative path to FastCGI process manager config file.
-t, --test Test FPM configuration and exit
-D, --daemonize force to run in background, and ignore daemonize option from config file
-F, --nodaemonize
force to stay in foreground, and ignore daemonize option from config file
-R, --allow-to-run-as-root
Allow pool to run as root (disabled by default)
根据上边提示 “-D”为后台启动服务
[root@vb01 src]# /usr/sbin/php-fpm -D
查看是否启动成功,php-fpm默认启动监听的是9000端口:
[root@vb01 src]# netstat -tnlpu|grep 9000
tcp 0 0 127.0.0.1:9000 0.0.0.0:* LISTEN 5841/php-fpm
那如何关闭php-fpm呢?可使用如下命令关闭:
kill -QUIT ‘cat /var/run/php-fpm/php-fpm.pid’
8.配置Nginx来支持php
下面是Nginx下支持PHP解析的一个虚拟主机配置实例:
server{
listen 80;
server_name www.linuxidc.com;
location / {
index index.html index.php;
root /var/www/linuxidc;
}
location ~ \.php$ {
root /var/www/linuxidc;
fastcgi_pass 127.0.0.1:9000;
fastcgi_index index.php;
fastcgi_param SCRIPT_FILENAME $document_root$fastcgi_script_name;
include fastcgi_params;
}
}
注意:
location指定的是PHP后缀的文件都交给127.0.0.1:9000来处理,这里的IP地址和端口就是FastCGI进程监听的IP地址和端口。
fastcgi_param指定PHP动态程序的主目录,我这里是$document_root,也就是/var/www/linuxidc。
接下来,重新启动Nginx
测试Nginx对PHP的解析
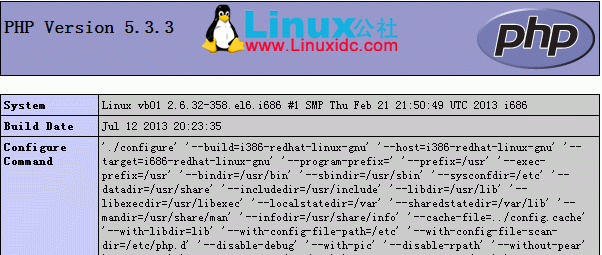
[root@vb01 conf]# echo '<?php phpinfo();?>' > /var/www/linuxidc/phpinfo.php
然后在浏览器里输入http://www.linuxidc.com/phpinfo.php 看是否正确解析,会出现PHP安装配置以及功能列表统计信息。
(责任编辑:IT) |