|
20130514补充: 必须配置转发。。。 net.ipv4.ip_forward = 1 这个忘了写上了,感谢网友 @mcg 的提醒 ~~~~~~~~ 昨晚写了三分之二的文章就因为电脑突然死机而烟消云散,定是因为我废话太多惩罚我来的。。。所以这次就精简些罢,不懂的就谷歌去。。。 Haproxy透明代理三步走: 编译内核 源码安装iptables 安装配置haproxy 系统版本: CentOS 5.5 目的: 搭建haproxy透明代理,做app服务负载均衡 步骤:
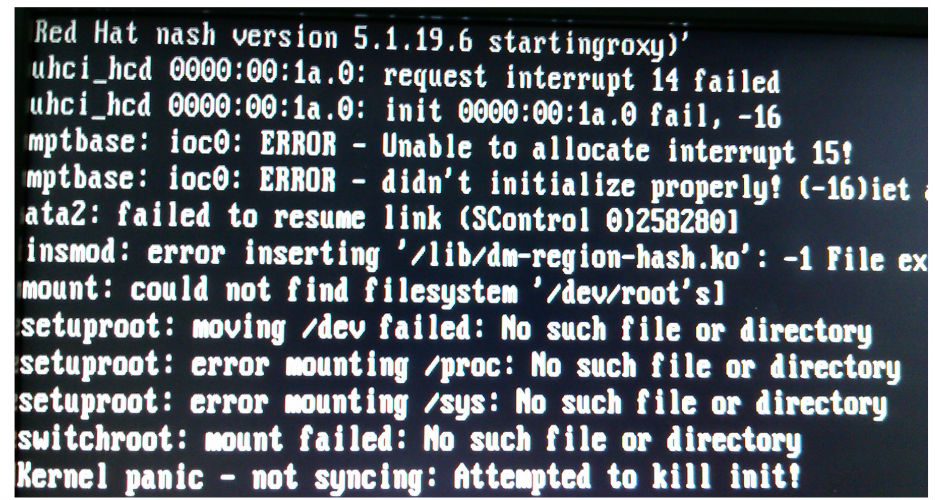
PS:当然也可以下载本人编译好的 kernel-2.6.32.27tproxy-1.i386.rpm,下载地址: 1、编译内核 为何要编译内核,只因为要用到tproxy。。。 内核版本2.6.28开始不用再打tproxy的补丁,所以在这里选择了kernel-2.6.32.27来编译 # yum install make rpm-build gcc gcc-c++ ncurses-devel elfutils elfutils-libs libstdc++-devel -y # cd /usr/src # wget http://www.kernel.org/pub/linux/kernel/v2.6/linux-2.6.32.27.tar.bz2 # tar xf linux-2.6.32.27.tar.bz2 # ln -s linux-2.6.32.27 linux # cd linux # make clean && make mrproper # cp /boot/config-`uname -r` ./.config # make menuconfig 选中 Load an Alternate Configuration File, 按Enter进去,默认加载 .config文件,即上面从/boot分区拷贝过来的 .config文件 然后选中以下对应的选项以支持TPROXY Networking > Networking support -> > Networking options -> > Network packet filtering framework (Netfilter) -> > Core Netfilter Configuration -> Transparent proxying support (EXPERIMENTAL) Netfilter Xtables support (required for ip_tables) Netfilter Connection tracking > Connection tracking flow accounting > Connection mark tracking support "TPROXY" target support (EXPERIMENTAL) "socket" match support (EXPERIMENTAL) 通常选中后会是下面两种情况: [*]: Built-in [M]: Module 尽可能以模块[M]选中以上对应的选项 Tips: 连按两下 <ESC> 可以返回上一层菜单 返回主菜单后选中以下选项: General setup –> [*] enable deprecated sysfs features to support old userspace tools 修改这项是因为旧版的mkinitrd及其nash在内核没有CONFIG_SYSFS_DEPRECATED_V2参数时默认使用旧版sysfs路径格式,从而在新内核下无法正确访问/sys内的硬盘信息节点。 不修改会报如下错误: mount: could not find filesystem ‘/dev/root’ setuproot: moving /dev failed: No such file or directory setuproot: error mounting /proc: No such file or directory setuproot: error mounting /sys: No such file or directory switchroot: mount failed: No such file or directory Kernel panic – not syncing: Attempted to kill init! Tips: 注意全部操作完成保存后编辑 .config文件查看一下是否有以下内容: CONFIG_SYSFS_DEPRECATED_V2=y 然后按enter编辑下面这个选项: General Setup —> () Local version – append to kernel release 输入一个字符串用来分辨新内核,比如: -tproxy 然后通过连按<ESC>退出编辑菜单,最后选择 YES 保存。。。 保存后执行下面的命令以生成rpm包: # make rpm 好了,现在可以去喝杯咖啡了--这个过程视机子性能不同而所需时间长短也不同。。。 生成的rpm包在 /usr/src/redhat/RPMS/i386(或者是x86_64) 我这里系统是64位的,所以。。。 # rpm -ivh --nodeps /usr/src/redhat/RPMS/x86_64/kernel-2.6.32.27tproxy-1.x86_64.rpm # mkinitrd /boot/initrd-2.6.32.27-tproxy.img 2.6.32.27-tproxy 编辑grub.conf文件,添加以下内容: title CentOS-Tproxy (2.6.32.27-tproxy) root (hd0,0) kernel /boot/vmlinuz-2.6.32.27-tproxy ro root=LABEL=/ initrd /boot/initrd-2.6.32.27-tproxy.img 保存后重启。。。 记住了,重启后须是从新内核进入系统。。。 Tips: 上面kernel那一行后面不要加其他东西,像我之前加了acpi=off noapic这两个参数启动时内核就崩溃了。。
从新内核启动进入系统,可以运行下面这条命令查看一下内核版本: # uname -a 2、源码安装iptables 内核编译完了,现在需要从源码安装iptables,因为centos5上的iptables版本太低,要支持tproxy的话还得打补丁,所以这里选择了较新版本 iptables1.4.8 # wget http://www.netfilter.org/projects/iptables/files/iptables-1.4.8.tar.bz2 # yum remove iptables -y # tar xf iptables-1.4.8.tar.bz2 # cd iptables-1.4.8 # ./configure --prefix=/usr/local/iptables # make && make install 3、安装配置haproxy
# wget http://haproxy.1wt.eu/download/1.4/src/haproxy-1.4.21.tar.gz

# tar xf haproxy-1.4.21.tar.gz

# cd haproxy-1.4.21

# yum -y install pcre-devel

# make TARGET=linux26 CPU=x86_64 USE_STATIC_PCRE=1 USE_LINUX_TPROXY=1

# make install target=linux26

# mkdir -p /usr/local/haproxy/{conf,run,sbin}

# ln -s /usr/local/sbin/haproxy /usr/local/haproxy/sbin
配置haproxy: # vi /usr/local/haproxy/conf/haproxy.cfg 添加以下内容: global log 127.0.0.1local1 notice maxconn32000 daemon pidfile /usr/local/haproxy/run/haproxy.pid defaults applications TCP log global mode tcp maxconn 32000 retries 3 option redispatch balance leastconn listen app_tcp 172.168.16.10:3999 mode tcp source 0.0.0.0 usesrc clientip option srvtcpka option clitcpka option tcpka option tcplog clitimeout 3d srvtimeout 3d contimeout 3d server app1 172.168.16.54:3999 check listen stats_auth 172.168.16.10:10800 mode http option httplog stats enable stats refresh 20s stats uri /status stats auth admin:admin stats hide-version 设置开机自启动: # vi /etc/rc.local 添加以下内容: /usr/local/haproxy/sbin/haproxy -D -f /usr/local/haproxy/conf/haproxy.cfg 配置平台日志支持: # vi /etc/syslog.conf 添加: local3.*/var/log/haproxy.log local0.*/var/log/haproxy.log
# vi /etc/sysconfig/syslog 修改: SYSLOGD_OPTIONS="-r -m 0" 重启一下: # /etc/init.d/syslog restart 配置路由转发: # vi /etc/sysctl.conf net.ipv4.conf.default.rp_filter=1 添加以下内容到/etc/rc.local iptables -t mangle -N DIVERT iptables -t mangle -A PREROUTING -p tcp -m socket -j DIVERT iptables -t mangle -A DIVERT -j MARK --set-mark 111 iptables -t mangle -A DIVERT -j ACCEPT ip rule add fwmark 111 lookup 100 ip route add local 0.0.0.0/0 dev lo table 100
Tips: 需要注意的一点,后端服务器的网关必须指向ha。。。 切记切记。。。 (责任编辑:IT) |

