|
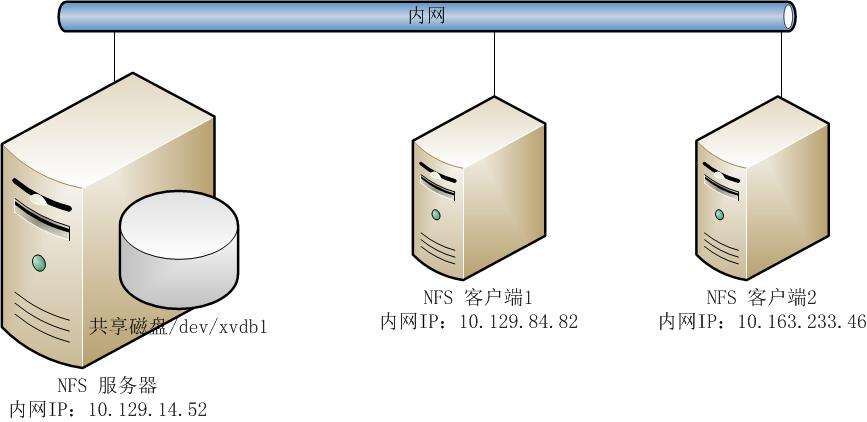
目前在使用云磁盘的时候,无法实现一块云磁盘同时挂载到多台服务器上的需求,只能实现一块磁盘挂载到一台服务器使用。 但可以通过搭建NFS服务,通过内网(默认同一个帐号下同一个region服务器内网互通)实现一块磁盘共享给多台服务器使用。 NFS的搭建环境如下:
系统环境: 服务器和客户端都是使用CentOS 6.5 64位系统。 [root@iZ28c6rit3oZ ~]# cat /etc/issue CentOS release 6.5 (Final) Kernel \r on an \m
[root@iZ28c6rit3oZ ~]# uname -a Linux iZ28c6rit3oZ 2.6.32-431.23.3.el6.x86_64 #1 SMP Thu Jul 31 17:20:51 UTC 2014 x86_64 x86_64 x86_64 GNU/Linux
假设,用户需要把10.129.14.52这台服务器中的/dev/xvdb1磁盘共享出来给10.129.84.82和10.163.233.46这两台服务器使用。
NFS安装: NFS服务器和客户端安装的软件包都是一致的,所以在此就仅以服务器端的安装举例说明。 默认的公共镜像生成的ECS Linux服务器是没有安装NFS需要的组件,镜像市场中的镜像是否安装就需要事先做判断。 rpm -qa | grep "rpcbind" #查看rpcbind软件包是否安装。
yum -y install rpcbind #手动安装rpcbind软件。
#安装完成的提示: Installed:
rpcbind.x86_64 0:0.2.0-11.el6
Dependency Installed: libgssglue.x86_64 0:0.1-11.el6 libtirpc.x86_64 0:0.2.1-10.el6
Complete!
rpm -qa | grep "rpcbind" #再次确认rpcbind是否安装成功。 rpcbind-0.2.0-11.el6.x86_64 #可以看到rpcbind软件已经安装成功。
rpm -qa | grep "nfs" #查看nfs软件包是否安装,默认CentOS 6.5系统是没有安装。
yum -y install nfs-utils #手动安装nfs软件包 #安装成功的提示: Installed: nfs-utils.x86_64 1:1.2.3-64.el6
Dependency Installed: keyutils.x86_64 0:1.4-5.el6 libevent.x86_64 0:1.4.13-4.el6 nfs-utils-lib.x86_64 0:1.1.5-11.el6 python-argparse.noarch 0:1.2.1-2.1.el6
Dependency Updated: keyutils-libs.x86_64 0:1.4-5.el6
Complete!
rpm -qa | grep "nfs" #再次确认nfs软件包是否安装成功。 nfs-utils-lib-1.1.5-11.el6.x86_64 nfs-utils-1.2.3-64.el6.x86_64
磁盘情况及挂载: [root@iZ28c6rit3oZ ~]# fdisk -l
Disk /dev/xvda: 21.5 GB, 21474836480 bytes 255 heads, 63 sectors/track, 2610 cylinders Units = cylinders of 16065 * 512 = 8225280 bytes Sector size (logical/physical): 512 bytes / 512 bytes I/O size (minimum/optimal): 512 bytes / 512 bytes Disk identifier: 0x00078f9c
Device Boot Start End Blocks Id System /dev/xvda1 * 1 2611 20970496 83 Linux
Disk /dev/xvdb: 5368 MB, 5368709120 bytes 255 heads, 63 sectors/track, 652 cylinders Units = cylinders of 16065 * 512 = 8225280 bytes Sector size (logical/physical): 512 bytes / 512 bytes I/O size (minimum/optimal): 512 bytes / 512 bytes Disk identifier: 0x00000000
[root@iZ28c6rit3oZ ~]# fdisk /dev/xvdb Device contains neither a valid DOS partition table, nor Sun, SGI or OSF disklabel Building a new DOS disklabel with disk identifier 0xb0112161. Changes will remain in memory only, until you decide to write them. After that, of course, the previous content won't be recoverable.
Warning: invalid flag 0x0000 of partition table 4 will be corrected by w(rite)
WARNING: DOS-compatible mode is deprecated. It's strongly recommended to switch off the mode (command 'c') and change display units to sectors (command 'u').
Command (m for help): p
Disk /dev/xvdb: 5368 MB, 5368709120 bytes 255 heads, 63 sectors/track, 652 cylinders Units = cylinders of 16065 * 512 = 8225280 bytes Sector size (logical/physical): 512 bytes / 512 bytes I/O size (minimum/optimal): 512 bytes / 512 bytes Disk identifier: 0xb0112161
Device Boot Start End Blocks Id System
Command (m for help): n Command action e extended p primary partition (1-4) p Partition number (1-4): 1 First cylinder (1-652, default 1): Using default value 1 Last cylinder, +cylinders or +size{K,M,G} (1-652, default 652): Using default value 652
Command (m for help): p
Disk /dev/xvdb: 5368 MB, 5368709120 bytes 255 heads, 63 sectors/track, 652 cylinders Units = cylinders of 16065 * 512 = 8225280 bytes Sector size (logical/physical): 512 bytes / 512 bytes I/O size (minimum/optimal): 512 bytes / 512 bytes Disk identifier: 0xb0112161
Device Boot Start End Blocks Id System /dev/xvdb1 1 652 5237158+ 83 Linux
Command (m for help): wq The partition table has been altered!
Calling ioctl() to re-read partition table. Syncing disks.
[root@iZ28c6rit3oZ ~]# mkfs.ext4 /dev/xvdb1 mke2fs 1.41.12 (17-May-2010) Filesystem label= OS type: Linux Block size=4096 (log=2) Fragment size=4096 (log=2) Stride=0 blocks, Stripe width=0 blocks 327680 inodes, 1309289 blocks 65464 blocks (5.00%) reserved for the super user First data block=0 Maximum filesystem blocks=1342177280 40 block groups 32768 blocks per group, 32768 fragments per group 8192 inodes per group Superblock backups stored on blocks: 32768, 98304, 163840, 229376, 294912, 819200, 884736
Writing inode tables: done Creating journal (32768 blocks): done Writing superblocks and filesystem accounting information: done
This filesystem will be automatically checked every 38 mounts or 180 days, whichever comes first. Use tune2fs -c or -i to override.
[root@iZ28c6rit3oZ ~]# cp -a /etc/fstab /etc/fstab.bak [root@iZ28c6rit3oZ ~]# vim /etc/fstab
# # /etc/fstab # Created by anaconda on Thu Aug 14 21:16:42 2014 # # Accessible filesystems, by reference, are maintained under '/dev/disk' # See man pages fstab(5), findfs(8), mount(8) and/or blkid(8) for more info # UUID=94e4e384-0ace-437f-bc96-057dd64f42ee / ext4 defaults,barrier=0 1 1 tmpfs /dev/shm tmpfs defaults 0 0 devpts /dev/pts devpts gid=5,mode=620 0 0 sysfs /sys sysfs defaults 0 0 proc /proc proc defaults 0 0 /dev/xvdb1 /mnt ext4 defaults 0 0
[root@iZ28c6rit3oZ ~]# mount -a [root@iZ28c6rit3oZ ~]# df -h Filesystem Size Used Avail Use% Mounted on /dev/xvda1 20G 1.5G 18G 8% / tmpfs 938M 0 938M 0% /dev/shm /dev/xvdb1 5.0G 138M 4.6G 3% /mnt
可以看到磁盘已经成功分区,并且挂载到/mnt目录中。 如果对于磁盘分区操作有疑问,可以参见帮助中心磁盘及分区。
NFS服务器创建共享目录: [root@iZ28c6rit3oZ ~]# mkdir /mnt/share #创建共享目录为/mnt/share
[root@iZ28c6rit3oZ ~]# vim /etc/exports #修改/etc/exports文件,输出共享目录 /mnt/share *(rw,sync,no_root_squash)
说明: /etc/exports文件内容格式: [客户端1 选项(访问权限,用户映射,其他)] [客户端2 选项(访问权限,用户映射,其他)] a. 输出目录: 输出目录是指NFS系统中需要共享给客户机使用的目录; b. 客户端: 客户端是指网络中可以访问这个NFS输出目录的计算机 客户端常用的指定方式
c. 选项: 选项用来设置输出目录的访问权限、用户映射等。 NFS主要有3类选项: 访问权限选项
用户映射选项
其它选项
每个客户端后面必须跟一个小括号,里面定义了此客户端的访问特性,比如访问权限等。 例如:
172.16.0.0/16(ro,async) 192.168.0.0/24(rw,sync)
[root@iZ28c6rit3oZ ~]# /etc/init.d/rpcbind start #启动rpcbind服务 Starting rpcbind: [ OK ]
[root@iZ28c6rit3oZ ~]# /etc/init.d/nfs start #启动nfs服务 Starting NFS services: [ OK ] Starting NFS quotas: [ OK ] Starting NFS mountd: rpc.mountd: svc_tli_create: could not open connection for udp6 rpc.mountd: svc_tli_create: could not open connection for tcp6 rpc.mountd: svc_tli_create: could not open connection for udp6 rpc.mountd: svc_tli_create: could not open connection for tcp6 rpc.mountd: svc_tli_create: could not open connection for udp6 rpc.mountd: svc_tli_create: could not open connection for tcp6 [ OK ] Starting NFS daemon: rpc.nfsd: address family inet6 not supported by protocol TCP [ OK ] Starting RPC idmapd: [ OK ]
[root@iZ28c6rit3oZ ~]# chkconfig rpcbind on #配置rpcbind开机自动启动 [root@iZ28c6rit3oZ ~]# chkconfig nfs on #配置nfs开机自动启动
NFS客户端挂载服务器共享的目录: 客户端1挂载服务器端的NFS资源: 因为操作方法和服务器端一致,先就不做说明,如果有疑问,可以参见NFS服务器的安装说明。 [root@iZ28i56ixcuZ ~]# yum -y install rpcbind [root@iZ28i56ixcuZ ~]# rpm -qa | grep rpcbind rpcbind-0.2.0-11.el6.x86_64
[root@iZ28i56ixcuZ ~]# rpm -qa | grep nfs [root@iZ28i56ixcuZ ~]# yum -y install nfs-utils
[root@iZ28q9kp4g6Z ~]# /etc/init.d/rpcbind start Starting rpcbind: [ OK ] [root@iZ28q9kp4g6Z ~]# /etc/init.d/nfs nfs nfslock [root@iZ28q9kp4g6Z ~]# /etc/init.d/nfs start Starting NFS services: [ OK ] Starting NFS quotas: [ OK ] Starting NFS mountd: rpc.mountd: svc_tli_create: could not open connection for udp6 rpc.mountd: svc_tli_create: could not open connection for tcp6 rpc.mountd: svc_tli_create: could not open connection for udp6 rpc.mountd: svc_tli_create: could not open connection for tcp6 rpc.mountd: svc_tli_create: could not open connection for udp6 rpc.mountd: svc_tli_create: could not open connection for tcp6 [ OK ] Starting NFS daemon: rpc.nfsd: address family inet6 not supported by protocol TCP [ OK ] Starting RPC idmapd: [ OK ]
[root@iZ28q9kp4g6Z ~]# chkconfig rpcbind on [root@iZ28q9kp4g6Z ~]# chkconfig nfs on
[root@iZ28i56ixcuZ ~]# showmount -e 10.129.14.52 #查看NFS服务器共享出来的目录 Export list for 10.129.14.52: /mnt/share *
[root@iZ28i56ixcuZ ~]# mount -t nfs 10.129.14.52:/mnt/share /mnt #挂载NFS服务器上共享出来的目录 [root@iZ28i56ixcuZ ~]# df -h Filesystem Size Used Avail Use% Mounted on /dev/xvda1 20G 1.5G 18G 8% / tmpfs 938M 0 938M 0% /dev/shm 10.129.14.52:/mnt/share 5.0G 138M 4.6G 3% /mnt 可以看到服务器共享出来的目录已经挂载成功。
客户端2挂载服务器端的NFS资源: 操作方法和客户端1是一致的,所以如果有疑问请参看客户端1的说明。 [root@iZ28q9kp4g6Z ~]# cat /etc/issue CentOS release 6.5 (Final) Kernel \r on an \m
[root@iZ28q9kp4g6Z ~]# uname -a Linux iZ28q9kp4g6Z 2.6.32-431.23.3.el6.x86_64 #1 SMP Thu Jul 31 17:20:51 UTC 2014 x86_64 x86_64 x86_64 GNU/Linux [root@iZ28q9kp4g6Z ~]# ifconfig | grep inet inet addr:10.163.233.46 Bcast:10.163.239.255 Mask:255.255.240.0 inet addr:121.42.27.129 Bcast:121.42.27.255 Mask:255.255.252.0 inet addr:127.0.0.1 Mask:255.0.0.0
[root@iZ28q9kp4g6Z ~]# showmount -e 10.129.14.52 Export list for 10.129.14.52: /mnt/share *
[root@iZ28q9kp4g6Z ~]# df -h Filesystem Size Used Avail Use% Mounted on /dev/xvda1 20G 1.5G 18G 8% / tmpfs 938M 0 938M 0% /dev/shm
[root@iZ28q9kp4g6Z ~]# mount -t nfs 10.129.14.52:/mnt/share /mnt [root@iZ28q9kp4g6Z ~]# df -h Filesystem Size Used Avail Use% Mounted on /dev/xvda1 20G 1.5G 18G 8% / tmpfs 938M 0 938M 0% /dev/shm 10.129.14.52:/mnt/share 5.0G 138M 4.6G 3% /mnt
可以看到已经成功挂载到NFS 服务器共享出来的目录。 在NFS服务器中共享目录中创建文件,测试客户端挂载的目录中能否访问到。 NFS服务器: [root@iZ28c6rit3oZ ~]# df -h Filesystem Size Used Avail Use% Mounted on /dev/xvda1 20G 1.5G 18G 8% / tmpfs 938M 0 938M 0% /dev/shm /dev/xvdb1 5.0G 138M 4.6G 3% /mnt [root@iZ28c6rit3oZ ~]# cd /mnt [root@iZ28c6rit3oZ mnt]# echo "This is a test file" >test.txt [root@iZ28c6rit3oZ mnt]# cat test.txt This is a test file [root@iZ28c6rit3oZ mnt]# mv test.txt share/ [root@iZ28c6rit3oZ mnt]# cd share/ [root@iZ28c6rit3oZ share]# ls #可以看到共享目录中已经创建了一个文件,名为test.txt test.txt
NFS 客户端: NFS客户端1: [root@iZ28i56ixcuZ ~]# ifconfig | grep inet inet addr:10.129.84.82 Bcast:10.129.95.255 Mask:255.255.240.0 inet addr:42.96.202.186 Bcast:42.96.203.255 Mask:255.255.252.0 inet addr:127.0.0.1 Mask:255.0.0.0 [root@iZ28i56ixcuZ ~]# cd /mnt [root@iZ28i56ixcuZ mnt]# ls test.txt [root@iZ28i56ixcuZ mnt]# cat test.txt #可以看到在NFS客户端中可以看到NFS服务器共享出来的文件 This is a test file
[root@iZ28i56ixcuZ mnt]# vim test.txt #可以看到NFS客户端可以修改NFS 服务器共享出来的目录,这个因为在NFS服务器端是赋予了客户端w(写)权限
This is a test file Client1 add test file.
NFS客户端2上面访问: root@iZ28i56ixcuZ mnt]# cat test.txt This is a test file Client1 add test file.
[root@iZ28q9kp4g6Z ~]# cd /mnt/ [root@iZ28q9kp4g6Z mnt]# ls test.txt [root@iZ28q9kp4g6Z mnt]# cat test.txt This is a test file Client1 add test file.
[root@iZ28q9kp4g6Z mnt]# vim test.txt This is a test file Client1 add test file. Client2 add test file too.
将NFS服务器端共享出来的目录实现开机自动挂载: NFS客户端1: [root@iZ28i56ixcuZ mnt]# ifconfig | grep inet inet addr:10.129.84.82 Bcast:10.129.95.255 Mask:255.255.240.0 inet addr:42.96.202.186 Bcast:42.96.203.255 Mask:255.255.252.0 inet addr:127.0.0.1 Mask:255.0.0.0
[root@iZ28i56ixcuZ mnt]# cp -a /etc/fstab /etc/fstab.bak [root@iZ28i56ixcuZ mnt]# vim /etc/fstab #设置NFS服务器端共享的目录开机自动挂载 # # /etc/fstab # Created by anaconda on Thu Aug 14 21:16:42 2014 # # Accessible filesystems, by reference, are maintained under '/dev/disk' # See man pages fstab(5), findfs(8), mount(8) and/or blkid(8) for more info # UUID=94e4e384-0ace-437f-bc96-057dd64f42ee / ext4 defaults,barrier=0 1 1 tmpfs /dev/shm tmpfs defaults 0 0 devpts /dev/pts devpts gid=5,mode=620 0 0 sysfs /sys sysfs defaults 0 0 proc /proc proc defaults 0 0 10.129.14.52:/mnt/share /mnt nfs defaults 0 0
[root@iZ28i56ixcuZ mnt]# mount -a [root@iZ28i56ixcuZ mnt]# df -h Filesystem Size Used Avail Use% Mounted on /dev/xvda1 20G 1.5G 18G 8% / tmpfs 938M 0 938M 0% /dev/shm 10.129.14.52:/mnt/share 5.0G 138M 4.6G 3% /mnt
[root@iZ28i56ixcuZ ~]# cp -a /etc/rc.d/rc.local /etc/rc.d/rc.local.bak [root@iZ28i56ixcuZ ~]# vim /etc/rc.d/rc.local #!/bin/sh # # This script will be executed *after* all the other init scripts. # You can put your own initialization stuff in here if you don't # want to do the full Sys V style init stuff.
touch /var/lock/subsys/local mount –a
重启测试,看看能实现自动挂载: init 6
[root@iZ28i56ixcuZ ~]# df -h Filesystem Size Used Avail Use% Mounted on /dev/xvda1 20G 1.5G 18G 8% / tmpfs 938M 0 938M 0% /dev/shm 10.129.14.52:/mnt/share 5.0G 138M 4.6G 3% /mnt
可以看到实现了开机自动挂载。 |