|
我们来看下,如何在Centos6.5下,部署完全分布式集群。 下面先来看下具体的系统环境
部署情况
部署步骤
1,首先我们的集群之间的ssh是信任的,方便hadoop进程之间的通信。 生成公钥:ssh-keygen -t rsa -P '' 拷贝信任:ssh-copy-id .ssh/id_rsa.pub root@hp2 2,配置各种环境变量包括java,maven,ant,hadoop等的变量,代码如下: export PATH=.:$PATH export JAVA_HOME="/usr/local/jdk" export CLASSPATH=.:$CLASSPATH:$JAVA_HOME/lib:$JAVA_HOME/jre/lib export PATH=$PATH:$JAVA_HOME/bin export HADOOP_HOME=/root/hadoop export HADOOP_CONF_DIR=$HADOOP_HOME/etc/hadoop export CLASSPATH=.:$CLASSPATH:$HADOOP_HOME/lib export PATH=$PATH:$HADOOP_HOME/bin:$HADOOP_HOME/sbin export ANT_HOME=/usr/local/ant export CLASSPATH=$CLASSPATH:$ANT_HOME/lib export PATH=$PATH:$ANT_HOME/bin export MAVEN_HOME="/usr/local/maven" export CLASSPATH=$CLASSPATH:$MAVEN_HOME/lib export PATH=$PATH:$MAVEN_HOME/bin 3,配置core-site.xml文件
<?xml version="1.0" encoding="UTF-8"?>
<?xml-stylesheet type="text/xsl" href="configuration.xsl"?>
<!--
  Licensed under the Apache License, Version 2.0 (the "License");
  you may not use this file except in compliance with the License.
  You may obtain a copy of the License at

    http://www.apache.org/licenses/LICENSE-2.0

  Unless required by applicable law or agreed to in writing, software
  distributed under the License is distributed on an "AS IS" BASIS,
  WITHOUT WARRANTIES OR CONDITIONS OF ANY KIND, either express or implied.
  See the License for the specific language governing permissions and
  limitations under the License. See accompanying LICENSE file.
-->

<!-- Put site-specific property overrides in this file. -->

<configuration>
    <property>
        <name>fs.default.name</name>
        <value>hdfs://192.168.46.28:9000</value>
    </property>
  <property>
    <name>hadoop.tmp.dir</name>
    <value>/root/hadoop/tmp</value>
  </property>

</configuration>
4,配置hdfs-site.xml文件
<?xml version="1.0" encoding="UTF-8"?>
<?xml-stylesheet type="text/xsl" href="configuration.xsl"?>
<!--
  Licensed under the Apache License, Version 2.0 (the "License");
  you may not use this file except in compliance with the License.
  You may obtain a copy of the License at

    http://www.apache.org/licenses/LICENSE-2.0

  Unless required by applicable law or agreed to in writing, software
  distributed under the License is distributed on an "AS IS" BASIS,
  WITHOUT WARRANTIES OR CONDITIONS OF ANY KIND, either express or implied.
  See the License for the specific language governing permissions and
  limitations under the License. See accompanying LICENSE file.
-->

<!-- Put site-specific property overrides in this file. -->

<configuration>
<property>
   <name>dfs.replication</name>
   <value>1</value>
 </property>

 <property>
   <name>dfs.namenode.name.dir</name>
   <value>/root/hadoop/nddir</value>
 </property>


 <property>
   <name>dfs.datanode.data.dir</name>
   <value>/root/hadoop/dddir</value>
 </property>

<property>
  <name>dfs.permissions</name>
  <value>false</value>
</property>

</configuration>
配置mapred-site.xml文件
<?xml version="1.0"?>
<?xml-stylesheet type="text/xsl" href="configuration.xsl"?>
<!--
  Licensed under the Apache License, Version 2.0 (the "License");
  you may not use this file except in compliance with the License.
  You may obtain a copy of the License at

    http://www.apache.org/licenses/LICENSE-2.0

  Unless required by applicable law or agreed to in writing, software
  distributed under the License is distributed on an "AS IS" BASIS,
  WITHOUT WARRANTIES OR CONDITIONS OF ANY KIND, either express or implied.
  See the License for the specific language governing permissions and
  limitations under the License. See accompanying LICENSE file.
-->

<!-- Put site-specific property overrides in this file. -->

<configuration>
<property>
<name>mapred.job.tracker</name>
<value>hp1:8021</value>
<final>true</final>
<description>The host and port that the MapReduce JobTracker runs at. </description>
</property>
<property>
    <name>mapreduce.cluster.temp.dir</name>
    <value></value>
    <description>No description</description>
    <final>true</final>
  </property>

  <property>
    <name>mapreduce.cluster.local.dir</name>
    <value></value>
    <description>No description</description>
    <final>true</final>
  </property>
</configuration>
配置yarn-site.xml文件
<?xml version="1.0"?>
<!--
  Licensed under the Apache License, Version 2.0 (the "License");
  you may not use this file except in compliance with the License.
  You may obtain a copy of the License at

    http://www.apache.org/licenses/LICENSE-2.0

  Unless required by applicable law or agreed to in writing, software
  distributed under the License is distributed on an "AS IS" BASIS,
  WITHOUT WARRANTIES OR CONDITIONS OF ANY KIND, either express or implied.
  See the License for the specific language governing permissions and
  limitations under the License. See accompanying LICENSE file.
-->
<configuration>

<property>
<name>yarn.nodemanager.aux-services</name>
<value>mapreduce_shuffle</value>
</property>

<property>
<name>yarn.nodemanager.aux-services.mapreduce.shuffle.class</name>
<value>org.apache.hadoop.mapred.ShuffleHandler</value>
</property>

<property>
<name>Yarn.nodemanager.aux-services</name>
<value>mapreduce.shuffle</value>
</property>

<property>
<name>yarn.resourcemanager.address</name>
<value>hp1:8032</value>
</property>

<property>
<name>yarn.resourcemanager.scheduler.address</name>
<value>hp1:8030</value>
</property>

<property>
<name>yarn.resourcemanager.resource-tracker.address</name>
<value>hp1:8031</value>
</property>

<property>
<name>yarn.resourcemanager.admin.address</name>
<value>hp1:8033</value>
</property>

<property>
<name>yarn.resourcemanager.webapp.address</name>
<value>hp1:8088</value>
</property>

</configuration>
配置slaves文件 192.168.46.28 192.168.46.29 192.168.46.30 配置好后,注意,在hdfs-site.xml文件里的目录,需要自己在hadoop根目录下创建,以及hadoop的HDFS的tmp目录。一切做好之后,我们就可以分发整套hadoop到从机上,然后格式化namenode,并启动集群,使用jps在主机,和从机上分别显示如下: master的jps显示如下: 4335 SecondaryNameNode 4464 ResourceManager 4553 NodeManager 4102 NameNode 4206 DataNode 6042 Jps slave上的jps显示如下: 1727 DataNode 1810 NodeManager 2316 Jps 确实jps命令显示的java进程正确,我们就可以访问,web界面进行查看了,截图如下: 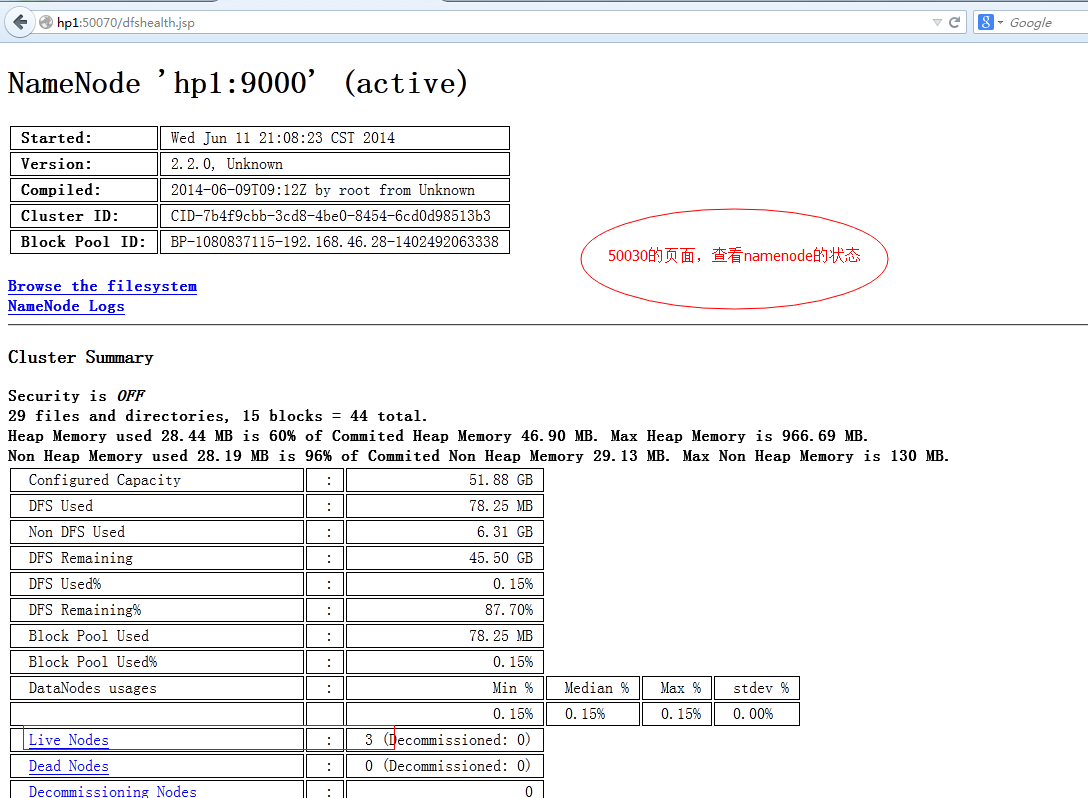  至此,我们已经成功的部署完成hadoop集群,安装时,注意散仙的步骤,按这样顺序来,一般不容易不错。 (责任编辑:IT) |