Centos+Nginx+MySql+Php既LNMP源码编译安装
时间:2014-07-03 02:04 来源:linux.it.net.cn 作者:IT网
前言:
我们都知道Apache作为一款出色的web服务器占据了市场大半个江山,他的地位目前还无人能取代,但是除了Apache,,在web服务器软件行列,Nginx以其性能稳定、功能丰富、运维简单、处理静静态文件速度快且消耗系统资源极少的优势,也同样赢得了许多人的青睐。
下面让我们能来了解一下linux下Nginx+mysql+php的源码安装方法。
准备工具:
mysql-5.5.15-linux2.6-i686.tar.gz
nginx-1.0.11.tar.gz
pcre-devel-6.6-2.el5_1.7.i386.rpm
libevent-2.0.16-stable.tar.gz
php-5.4.3.tar.gz
xcache-2.0.1.tar.gz
一.安装mysql(二进制)
这里为了节省时间,mysql采用二进制方式安装,源代码安装前面在LAMP环境搭建的时候已经介绍过,若有需要,请参见LAMP环境搭建
[root@lly ~]# tar -zxvf mysql-5.5.15-linux2.6-i686.tar.gz -C /usr/local/
[root@lly ~]# cd /usr/local/
[root@lly local]#ll

生成的mysql-5.5。。。。。的目录名字比较长,操作的时候不容易记住,我们可以给他改个名,或者做个链接。这里做个链接把
[root@lly local]# ln -s mysql-5.5.15-linux2.6-i686 mysql
[root@lly local]# cd mysql这样就能直接进入mysql目录了
[root@lly mysql]# less INSTALL-BINARY 查看mysql的二进制安装步骤
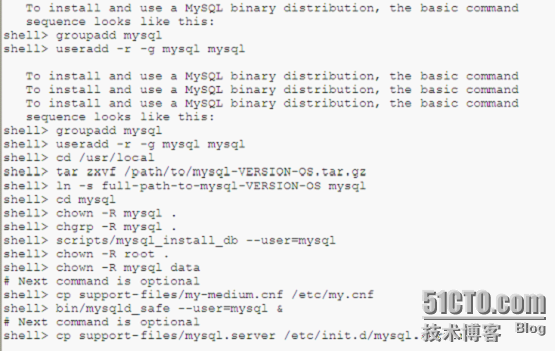
[root@lly ~]# groupadd -r mysql 创建组
[root@lly ~]# useradd -r -g mysql mysql -M 创建帐号-M表示不创建家目录
[root@lly ~]# cd /usr/local/mysql
[root@lly mysql]# chown -R mysql . 把当前目录下所有对象所有者改为mysql
[root@lly mysql]# chgrp -R mysql . 把当前目录下所有对象所有组改为mysql
[root@lly mysql]# scripts/mysql_install_db --user=mysql 初始化
[root@lly mysql]# chown -R root .
[root@lly mysql]# chown -R mysql data 除了data目录其他的目录所有者都改为管理员
[root@lly mysql]# cp support-files/my-medium.cnf /etc/my.cnf 把support-file下的mysql配置文件拷贝到etc目录下改名为my.cnf
[root@lly mysql]# cp support-files/mysql.server /etc/init.d/mysqld 生成mysql服务的控制文件
[root@lly mysql]# chmod a+x /etc/init.d/mysqld
[root@lly mysql]# chkconfig --add mysqld
[root@lly mysql]# chkconfig --list |grep mysql

[root@lly mysql]# service mysqld start 启动mysql服务
[root@lly mysql]# netstat -tupln |grep 3306 查看端口是否启动

[root@lly mysql]#/usr/local/mysql/bin
[root@lly bin]# vim /etc/profile 把mysql服务加入到变量里去,以方便我们日后的访问
添加路径
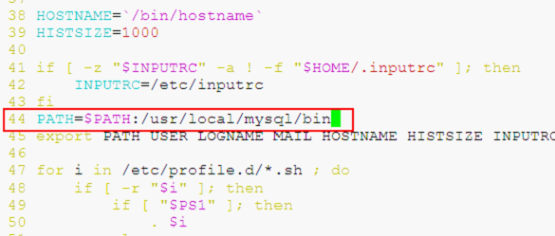
[root@lly bin]# . /etc/profile 执行
[root@lly bin]# mysql 输入mysql即可访问

[root@lly bin]# mysqladmin -u root -p password '123' 创建一个管理员的口令
[root@lly bin]# cd ..
[root@lly mysql]# vim /etc/ld.so.conf.d/mysql.conf
把mysql的库文件写入环境

[root@lly mysql]# ldconfig 刷新
[root@lly mysql]# ldconfig -pv |grep mysql 查看是否导入

[root@lly mysql]# ln -s include /usr/include/mysql 对mysql的头文件做一个连接
Mysql配置完成
二.安装nginx
安装nginx之前要安装pcre(兼容的正则表达式库)和lievent
1。安装pcre(这里借用光盘中的软件包进行安装)
[root@lly ~]# mount /dev/cdrom /mnt/cdrom 挂载光驱
[root@lly ~]# cd /mnt/cdrom/Server/
[root@lly Server]# rpm -ivh pcre-devel-6.6-2.el5_1.7.i386.rpm 安装pcre的rpm包
2。安装libevent
[root@lly Server]#cd
[root@lly ~]# tar -zxvf libevent-2.0.16-stable.tar.gz -C /usr/local/src/
[root@lly ~]# cd /usr/local/src/libevent-2.0.16-stable/
[root@lly libevent-2.0.16-stable]# ./configure --prefix=/usr/local/libevent 指明安装路径
[root@lly libevent-2.0.16-stable]# make
[root@lly libevent-2.0.16-stable]# make install
[root@lly libevent-2.0.16-stable]# cd /usr/local/libevent/
[root@lly libevent]# vim /etc/ld.so.conf.d/libevent.conf
把库文件写入

[root@lly libevent]# ldconfig 刷新
[root@lly libevent]# ldconfig -pv |grep libevent

[root@lly libevent]# ln -s /usr/local/libevent/include/ /usr/include/libevent 对其头文件做一个链接
安装nginx
[root@lly libevent]# cd
[root@lly ~]# tar -zxvf nginx-1.0.11.tar.gz -C /usr/local/src/
Nginx是以进程方式运行的,需要创建账号。
[root@lly nginx-1.0.11]# groupadd -r nginx
[root@lly nginx-1.0.11]# useradd -s /sbin/nologin -M -r -g nginx nginx 创建帐号
[root@lly nginx-1.0.11]#./configure \
--conf-path=/etc/nginx/nginx.conf \
--error-log-path=/var/log/nginx/error.log \
--http-log-path=/var/log/nginx/access.log \
--pid-path=/var/run/nginx/nginx.pid \
--lock-path=/var/lock/nginx.lock \
--user=nginx \
--group=nginx \
--with-http_ssl_module \
--with-http_flv_module \
--with-http_stub_status_module \
--with-http_gzip_static_module \
--http-client-body-temp-path=/var/tmp/nginx/client/ \
--http-proxy-temp-path=/var/tmp/nginx/proxy/ \
--http-fastcgi-temp-path=/var/tmp/nginx/fcgi/ \
--with-pcre
[root@lly nginx-1.0.11]# make
[root@lly nginx-1.0.11]# make install
[root@lly nginx-1.0.11]# cd /etc/nginx/
[root@lly nginx]# ll /usr/local/nginx/
给nginx编写一个控制脚本
[root@lly nginx]# ll /usr/local/nginx/sbin/
[root@lly ~]#vim /etc/init.d/nginx
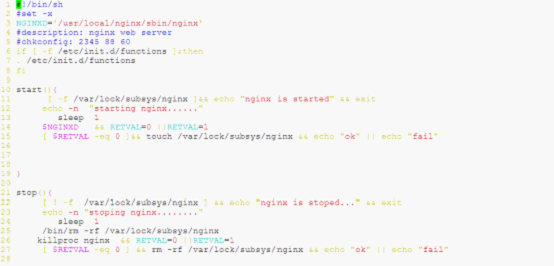

[root@lly ~]# chmod a+x /etc/init.d/nginx
[root@lly ~]# chkconfig --add nginx
[root@lly ~]# chkconfig --list |grep nginx

[root@lly ~]# service nginx start 启动nginx
[root@lly ~]# netstat -tupln |grep 80 查看nginx的80端口是否启动

浏览器输入http://192.168.126.129/测试

三.安装php
[root@lly ~]# tar -zxvf php-5.4.3.tar.gz -C /usr/local/src/
[root@lly ~]# cd /usr/local/src/php-5.4.3/
[root@lly php-5.4.3]# ./configure --prefix=/usr/local/php --enable-fpm --enable-sockets --with-mysql=/usr/local/mysql --with-mysqli=/usr/local/mysql/bin/mysql_config --enable-mbstring --enable-xml --with-png-dir --with-png --with-jpeg-dir --with-zlib --with-freetype-dir --with-config-file-path=/etc/php --with-config-file-scan-dir=/etc/php5.d
[root@lly php-5.4.3]# make
[root@lly php-5.4.3]# make install
[root@lly php-5.4.3]# mkdir /etc/php /etc/php5.d
[root@lly php-5.4.3]# cp php.ini-production /etc/php
[root@lly php-5.4.3]# cp sapi/fpm/init.d.php-fpm /etc/init.d/php-fpm
[root@lly php-5.4.3]# chmod a+x /etc/init.d/php-fpm 为控制脚本添加权限
[root@lly php-5.4.3]# cd /usr/local/php/etc/
[root@lly etc]# cp php-fpm.conf.default php-fpm.conf 生成php-fpm配置文件
[root@lly etc]# chkconfig --add php-fpm
[root@lly etc]# chkconfig --list |grep fpm
[root@lly etc]# service php-fpm start
[root@lly etc]# netstat -tupln |grep php-fpm

此时要想nginx能够完成php的页面请求
[root@lly etc]# vim /etc/nginx/nginx.conf

写清楚主页面

做一个php的测试页面方便测试
[root@lly etc]# cd /usr/local/nginx/html/
[root@lly html]# ll
total 16
-rw-r--r-- 1 root root 383 Apr 13 10:28 50x.html
-rw-r--r-- 1 root root 151 Apr 13 10:28 index.html
[root@lly html]# mv index.html index.php把index.html改为index.php
[root@lly html]# vim index.php
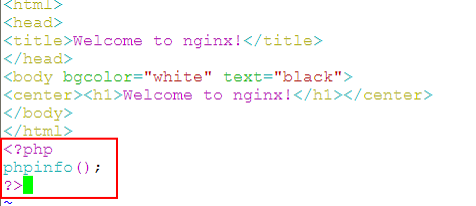
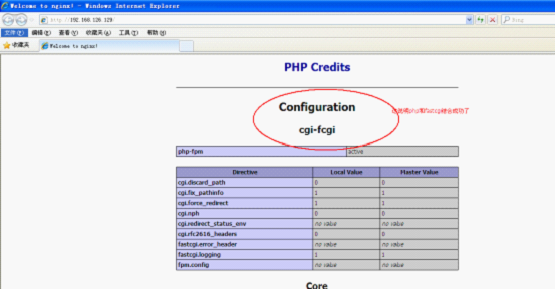
重启nginx和fastcgi服务
[root@lly html]# service nginx restart
[root@lly html]# service php-fpm restart
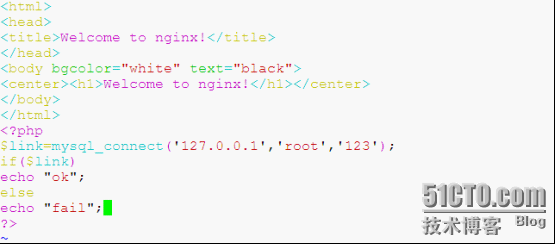
编辑测试页测试与数据库的连接
[root@lly html]# vim index.php
浏览器输入http://192.168.126.129

说明与数据库连接成功
四.Php加速工具xcache的安装使用
[root@lly ~]# tar -zxvf xcache-2.0.1.tar.gz -C /usr/local/src/
[root@lly ~]# cd /usr/local/src/xcache-2.0.1/
[root@lly xcache-2.0.1]# less INSTALL 查看安装说明

需要使用phpize先生成configure文件
但是phpize在哪呢?其实 就在/usr/local/php/bin/目录下
直接执行
[root@lly xcache-2.0.1]# /usr/local/php/bin/phpize
然后/usr/local/src/xcache-2.0.1/目录下就生成了configure文件
安装
[root@llyxcache-2.0.1]# ./configure --enable-xcache --with-php-config=/usr/local/php/bin/php-config
[root@lly xcache-2.0.1]# make
[root@lly xcache-2.0.1]# make install

这里的这个目录是xcache与php结合后形成的模块的目录
[root@lly xcache-2.0.1]# cp xcache.ini /etc/php5.d/说明:安装php的时候有一个php.5文件xcache要和php很好地结合把xcache.ini文件拷过去
[root@lly xcache-2.0.1]# vim /etc/php5.d/xcache.ini
第10行和12行是windows下的配置用双分号注释掉

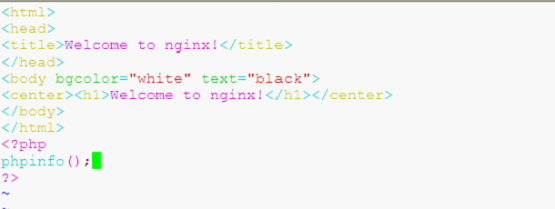
编写测试页
[root@lly xcache-2.0.1]# cd /usr/local/nginx/html/
[root@lly html]# vim index.php
[root@lly html]# service php-fpm restart
浏览器输入http://192.168.126.129
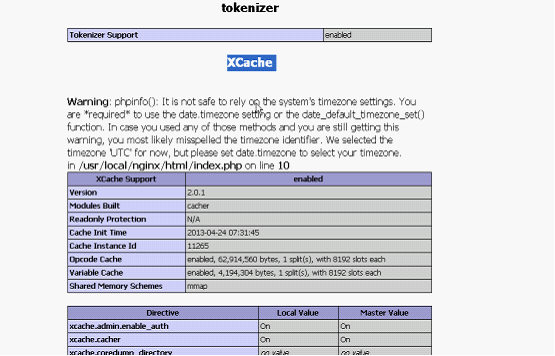
这样xcache和php结合成功
为了方便xcache的管理
[root@lly html]# cd /usr/local/src/xcache-2.0.1/

这个目录下是xcache管理的php页面文件
[root@lly xcache-2.0.1]# cp -r admin/ /usr/local/nginx/html/把admiin下的文件拷到html目录下
[root@lly html]# chmod a+rx admin/添加访问查看的权限
[root@lly html]# cd admin/
[root@lly admin]# chmod a+r index.php 添加查看权限
浏览器输入http://192.168.126.129/admin

输入默认用户名密码admin登陆就行了

本文出自 “HWOTT” 博客,请务必保留此出处http://iceblock.blog.51cto.com/6758400/1190538
(责任编辑:IT)
前言: 我们都知道Apache作为一款出色的web服务器占据了市场大半个江山,他的地位目前还无人能取代,但是除了Apache,,在web服务器软件行列,Nginx以其性能稳定、功能丰富、运维简单、处理静静态文件速度快且消耗系统资源极少的优势,也同样赢得了许多人的青睐。 下面让我们能来了解一下linux下Nginx+mysql+php的源码安装方法。 准备工具: mysql-5.5.15-linux2.6-i686.tar.gz nginx-1.0.11.tar.gz pcre-devel-6.6-2.el5_1.7.i386.rpm libevent-2.0.16-stable.tar.gz php-5.4.3.tar.gz xcache-2.0.1.tar.gz 一.安装mysql(二进制) 这里为了节省时间,mysql采用二进制方式安装,源代码安装前面在LAMP环境搭建的时候已经介绍过,若有需要,请参见LAMP环境搭建 [root@lly ~]# tar -zxvf mysql-5.5.15-linux2.6-i686.tar.gz -C /usr/local/ [root@lly ~]# cd /usr/local/ [root@lly local]#ll
生成的mysql-5.5。。。。。的目录名字比较长,操作的时候不容易记住,我们可以给他改个名,或者做个链接。这里做个链接把 [root@lly local]# ln -s mysql-5.5.15-linux2.6-i686 mysql [root@lly local]# cd mysql这样就能直接进入mysql目录了 [root@lly mysql]# less INSTALL-BINARY 查看mysql的二进制安装步骤
[root@lly ~]# groupadd -r mysql 创建组 [root@lly ~]# useradd -r -g mysql mysql -M 创建帐号-M表示不创建家目录 [root@lly ~]# cd /usr/local/mysql [root@lly mysql]# chown -R mysql . 把当前目录下所有对象所有者改为mysql [root@lly mysql]# chgrp -R mysql . 把当前目录下所有对象所有组改为mysql [root@lly mysql]# scripts/mysql_install_db --user=mysql 初始化 [root@lly mysql]# chown -R root . [root@lly mysql]# chown -R mysql data 除了data目录其他的目录所有者都改为管理员 [root@lly mysql]# cp support-files/my-medium.cnf /etc/my.cnf 把support-file下的mysql配置文件拷贝到etc目录下改名为my.cnf [root@lly mysql]# cp support-files/mysql.server /etc/init.d/mysqld 生成mysql服务的控制文件 [root@lly mysql]# chmod a+x /etc/init.d/mysqld [root@lly mysql]# chkconfig --add mysqld [root@lly mysql]# chkconfig --list |grep mysql
[root@lly mysql]# service mysqld start 启动mysql服务 [root@lly mysql]# netstat -tupln |grep 3306 查看端口是否启动
[root@lly mysql]#/usr/local/mysql/bin [root@lly bin]# vim /etc/profile 把mysql服务加入到变量里去,以方便我们日后的访问 添加路径
[root@lly bin]# . /etc/profile 执行 [root@lly bin]# mysql 输入mysql即可访问
[root@lly bin]# mysqladmin -u root -p password '123' 创建一个管理员的口令 [root@lly bin]# cd .. [root@lly mysql]# vim /etc/ld.so.conf.d/mysql.conf 把mysql的库文件写入环境
[root@lly mysql]# ldconfig 刷新 [root@lly mysql]# ldconfig -pv |grep mysql 查看是否导入
[root@lly mysql]# ln -s include /usr/include/mysql 对mysql的头文件做一个连接 Mysql配置完成 二.安装nginx 安装nginx之前要安装pcre(兼容的正则表达式库)和lievent 1。安装pcre(这里借用光盘中的软件包进行安装) [root@lly ~]# mount /dev/cdrom /mnt/cdrom 挂载光驱 [root@lly ~]# cd /mnt/cdrom/Server/ [root@lly Server]# rpm -ivh pcre-devel-6.6-2.el5_1.7.i386.rpm 安装pcre的rpm包 2。安装libevent [root@lly Server]#cd [root@lly ~]# tar -zxvf libevent-2.0.16-stable.tar.gz -C /usr/local/src/ [root@lly ~]# cd /usr/local/src/libevent-2.0.16-stable/ [root@lly libevent-2.0.16-stable]# ./configure --prefix=/usr/local/libevent 指明安装路径 [root@lly libevent-2.0.16-stable]# make [root@lly libevent-2.0.16-stable]# make install [root@lly libevent-2.0.16-stable]# cd /usr/local/libevent/ [root@lly libevent]# vim /etc/ld.so.conf.d/libevent.conf 把库文件写入
[root@lly libevent]# ldconfig 刷新 [root@lly libevent]# ldconfig -pv |grep libevent
[root@lly libevent]# ln -s /usr/local/libevent/include/ /usr/include/libevent 对其头文件做一个链接 安装nginx [root@lly libevent]# cd [root@lly ~]# tar -zxvf nginx-1.0.11.tar.gz -C /usr/local/src/ Nginx是以进程方式运行的,需要创建账号。 [root@lly nginx-1.0.11]# groupadd -r nginx [root@lly nginx-1.0.11]# useradd -s /sbin/nologin -M -r -g nginx nginx 创建帐号 [root@lly nginx-1.0.11]#./configure \ --conf-path=/etc/nginx/nginx.conf \ --error-log-path=/var/log/nginx/error.log \ --http-log-path=/var/log/nginx/access.log \ --pid-path=/var/run/nginx/nginx.pid \ --lock-path=/var/lock/nginx.lock \ --user=nginx \ --group=nginx \ --with-http_ssl_module \ --with-http_flv_module \ --with-http_stub_status_module \ --with-http_gzip_static_module \ --http-client-body-temp-path=/var/tmp/nginx/client/ \ --http-proxy-temp-path=/var/tmp/nginx/proxy/ \ --http-fastcgi-temp-path=/var/tmp/nginx/fcgi/ \ --with-pcre [root@lly nginx-1.0.11]# make [root@lly nginx-1.0.11]# make install [root@lly nginx-1.0.11]# cd /etc/nginx/ [root@lly nginx]# ll /usr/local/nginx/ 给nginx编写一个控制脚本 [root@lly nginx]# ll /usr/local/nginx/sbin/ [root@lly ~]#vim /etc/init.d/nginx
[root@lly ~]# chmod a+x /etc/init.d/nginx [root@lly ~]# chkconfig --add nginx [root@lly ~]# chkconfig --list |grep nginx
[root@lly ~]# service nginx start 启动nginx [root@lly ~]# netstat -tupln |grep 80 查看nginx的80端口是否启动
浏览器输入http://192.168.126.129/测试
三.安装php [root@lly ~]# tar -zxvf php-5.4.3.tar.gz -C /usr/local/src/ [root@lly ~]# cd /usr/local/src/php-5.4.3/ [root@lly php-5.4.3]# ./configure --prefix=/usr/local/php --enable-fpm --enable-sockets --with-mysql=/usr/local/mysql --with-mysqli=/usr/local/mysql/bin/mysql_config --enable-mbstring --enable-xml --with-png-dir --with-png --with-jpeg-dir --with-zlib --with-freetype-dir --with-config-file-path=/etc/php --with-config-file-scan-dir=/etc/php5.d [root@lly php-5.4.3]# make [root@lly php-5.4.3]# make install [root@lly php-5.4.3]# mkdir /etc/php /etc/php5.d [root@lly php-5.4.3]# cp php.ini-production /etc/php [root@lly php-5.4.3]# cp sapi/fpm/init.d.php-fpm /etc/init.d/php-fpm [root@lly php-5.4.3]# chmod a+x /etc/init.d/php-fpm 为控制脚本添加权限 [root@lly php-5.4.3]# cd /usr/local/php/etc/ [root@lly etc]# cp php-fpm.conf.default php-fpm.conf 生成php-fpm配置文件 [root@lly etc]# chkconfig --add php-fpm [root@lly etc]# chkconfig --list |grep fpm [root@lly etc]# service php-fpm start [root@lly etc]# netstat -tupln |grep php-fpm
此时要想nginx能够完成php的页面请求 [root@lly etc]# vim /etc/nginx/nginx.conf
写清楚主页面
做一个php的测试页面方便测试 [root@lly etc]# cd /usr/local/nginx/html/ [root@lly html]# ll total 16 -rw-r--r-- 1 root root 383 Apr 13 10:28 50x.html -rw-r--r-- 1 root root 151 Apr 13 10:28 index.html [root@lly html]# mv index.html index.php把index.html改为index.php [root@lly html]# vim index.php
重启nginx和fastcgi服务 [root@lly html]# service nginx restart [root@lly html]# service php-fpm restart
编辑测试页测试与数据库的连接 [root@lly html]# vim index.php
浏览器输入http://192.168.126.129
说明与数据库连接成功 四.Php加速工具xcache的安装使用 [root@lly ~]# tar -zxvf xcache-2.0.1.tar.gz -C /usr/local/src/ [root@lly ~]# cd /usr/local/src/xcache-2.0.1/ [root@lly xcache-2.0.1]# less INSTALL 查看安装说明
需要使用phpize先生成configure文件 但是phpize在哪呢?其实 就在/usr/local/php/bin/目录下 直接执行 [root@lly xcache-2.0.1]# /usr/local/php/bin/phpize 然后/usr/local/src/xcache-2.0.1/目录下就生成了configure文件 安装 [root@llyxcache-2.0.1]# ./configure --enable-xcache --with-php-config=/usr/local/php/bin/php-config [root@lly xcache-2.0.1]# make [root@lly xcache-2.0.1]# make install
这里的这个目录是xcache与php结合后形成的模块的目录 [root@lly xcache-2.0.1]# cp xcache.ini /etc/php5.d/说明:安装php的时候有一个php.5文件xcache要和php很好地结合把xcache.ini文件拷过去 [root@lly xcache-2.0.1]# vim /etc/php5.d/xcache.ini 第10行和12行是windows下的配置用双分号注释掉
编写测试页 [root@lly xcache-2.0.1]# cd /usr/local/nginx/html/ [root@lly html]# vim index.php
[root@lly html]# service php-fpm restart 浏览器输入http://192.168.126.129
这样xcache和php结合成功 为了方便xcache的管理 [root@lly html]# cd /usr/local/src/xcache-2.0.1/
这个目录下是xcache管理的php页面文件 [root@lly xcache-2.0.1]# cp -r admin/ /usr/local/nginx/html/把admiin下的文件拷到html目录下 [root@lly html]# chmod a+rx admin/添加访问查看的权限 [root@lly html]# cd admin/ [root@lly admin]# chmod a+r index.php 添加查看权限 浏览器输入http://192.168.126.129/admin
输入默认用户名密码admin登陆就行了
本文出自 “HWOTT” 博客,请务必保留此出处http://iceblock.blog.51cto.com/6758400/1190538 (责任编辑:IT) |