Hadoop 2.2.0安装及配置
时间:2014-11-29 20:53 来源:linux.it.net.cn 作者:IT
Pre-installation
保证所有主机上已经安装JDK 1.6+和ssh。
添加主机名到/etc/hosts
修改/etc/hosts
1
sudo vi /etc/hosts
添加
1
2
192.168.56.101 zhenlong-master
192.168.56.102 zhenlong-slave1
配置无密码的ssh连接
在所有主机上生成ssh的公钥和私钥
1
ssh-keygen -t rsa
在master主机上,生成authorized_keys
1
2
cp ~/.ssh/id_rsa.pub ~/.ssh/authorized_keys
chmod 644 ~/.ssh/authorized_keys
,并copy到所有slaves的~/.ssh/目录。
Installation
Download Apache Hadoop
Apache Hadoop: http://www.apache.org/dyn/closer.cgi/hadoop/common/
保证master和slaves上面的hadoop解压的相同的目录
Set Environment Variables
1
2
export HADOOP_HOME=/home/hadoop/hadoop-2.2.0
export JAVA_HOME=/home/hadoop/jdk1.6.0_45
Hadoop Configuration
修改conf文件夹下面的几个文件:
-
core-site.xml
1
2
3
4
5
6
7
8
9
10
<configuration>
  <property>
      <name>fs.default.name</name>
      <value>hdfs://zhenlong-master:9000</value>
  </property>
  <property>
      <name>hadoop.tmp.dir</name>
      <value>/home/hadoop/hadoop_tmp/hadoop2</value>
  </property>
</configuration>
-
hdfs-site.xml
1
2
3
4
5
6
7
8
9
10
11
12
13
14
15
16
<configuration>
  <property>
      <name>dfs.namenode.name.dir</name>
      <value>/home/hadoop/hadoop_dfs/hadoop2/name</value>
      <description>Path on the local filesystem where the NameNode stores the namespace and transactions logs persistently.</description>
  </property>
  <property>
      <name>dfs.datanode.data.dir</name>
      <value>/home/hadoop/hadoop_dfs/hadoop2/data</value>
      <description>Comma separated list of paths on the local filesystem of a DataNode where it should store its blocks.</description>
  </property>
  <property>
      <name>dfs.permissions</name>
      <value>false</value>
  </property>
</configuration>
-
mapred-site.xml
1
2
3
4
5
6
<configuration>
  <property>
      <name>mapreduce.framework.name</name>
      <value>yarn</value>
  </property>
</configuration>
-
yarn-site.xml
1
2
3
4
5
6
7
8
9
10
11
12
13
14
15
16
17
18
19
20
21
22
23
24
25
26
27
28
29
30
31
32
33
34
35
36
37
38
39
40
41
42
43
44
45
46
47
48
49
50
51
<configuration>
  <property>
      <name>yarn.resourcemanager.resource-tracker.address</name>
      <value>zhenlong-master:8031</value>
      <description>host is the hostname of the resource manager and    port is the port on which the NodeManagers contact the Resource Manager.          </description>
  </property>
  <property>
      <name>yarn.resourcemanager.scheduler.address</name>
      <value>zhenlong-master:8030</value>
      <description>host is the hostname of the resourcemanager and port is the port    on which the Applications in the cluster talk to the Resource Manager.          </description>
  </property>
  <property>
      <name>yarn.resourcemanager.scheduler.class</name>
      <value>org.apache.hadoop.yarn.server.resourcemanager.scheduler.capacity.CapacityScheduler</value>
      <description>In case you do not want to use the default scheduler</description>
  </property>
  <property>
      <name>yarn.resourcemanager.address</name>
      <value>zhenlong-master:8032</value>
      <description>the host is the hostname of the ResourceManager and the port is the port on    which the clients can talk to the Resource Manager. </description>
  </property>
  <property>
      <name>yarn.nodemanager.local-dirs</name>
      <value>${hadoop.tmp.dir}/nodemanager/local</value>
      <description>the local directories used by the nodemanager</description>
  </property>
  <property>
      <name>yarn.nodemanager.address</name>
      <value>0.0.0.0:8034</value>
      <description>the nodemanagers bind to this port</description>
  </property>
  <property>
      <name>yarn.nodemanager.remote-app-log-dir</name>
      <value>${hadoop.tmp.dir}/nodemanager/remote</value>
      <description>directory on hdfs where the application logs are moved to </description>
  </property>
  <property>
      <name>yarn.nodemanager.log-dirs</name>
      <value>${hadoop.tmp.dir}/nodemanager/logs</value>
      <description>the directories used by Nodemanagers as log directories</description>
  </property>
  <!-- Use mapreduce_shuffle instead of mapreduce.suffle (YARN-1229)-->
  <property>
      <name>yarn.nodemanager.aux-services</name>
      <value>mapreduce_shuffle</value>
  </property>
  <property>
      <name>yarn.nodemanager.aux-services.mapreduce.shuffle.class</name>
      <value>org.apache.hadoop.mapred.ShuffleHandler</value>
  </property>
</configuration>
-
slaves
1
zhenlong-slave1
-
hadoop-env.sh
1
export JAVA_HOME=/home/hadoop/jdk1.6.0_45
此处JAVA_HOME可以根据每天Server情况设定。
格式化NameNode
第一次启动,需要先格式化NameNode。
1
hadoop namenode -format
Start Hadoop
1
~/hadoop-2.2.0/sbin/start-all.sh

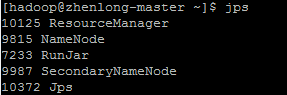
-
In master
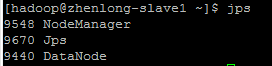
-
In slaves
Test
-
HDFS Web UI: http://zhenlong-master:50070
-
YARN Web UI: http://zhenlong-master:8088
-
YARN && MapReduce 测试:
1
~/hadoop-2.2.0/bin/hadoop jar ~/hadoop-2.2.0/share/hadoop/mapreduce/hadoop-mapreduce-examples-2.2.0.jar wordcount file wordcount_out

(责任编辑:IT)
Pre-installation保证所有主机上已经安装JDK 1.6+和ssh。 添加主机名到/etc/hosts修改/etc/hosts
添加
配置无密码的ssh连接在所有主机上生成ssh的公钥和私钥
在master主机上,生成authorized_keys
,并copy到所有slaves的~/.ssh/目录。 InstallationDownload Apache HadoopApache Hadoop: http://www.apache.org/dyn/closer.cgi/hadoop/common/ 保证master和slaves上面的hadoop解压的相同的目录 Set Environment Variables
Hadoop Configuration修改conf文件夹下面的几个文件:
此处JAVA_HOME可以根据每天Server情况设定。 格式化NameNode第一次启动,需要先格式化NameNode。
Start Hadoop
Test
|